I’ve attempted a Hands-on Lab on A Cloud Guru titled Use Application Load Balancers for Web Servers. In this lab, I configured an Application Load Balancer (ALB) to distribute network traffic to two EC2 instances, while also enabling sticky sessions to ensure users are consistently directed to the same server.
I approached the lab in two different ways. First, I followed the traditional method by creating a default VPC and using the legacy load balancer (using the elb subcommand). Then, I took a deep dive into the networking aspect and started from scratch, and utilizing the newer version of the load balancer (using the elbv2 subcommand).
First approach
To get started, I created a default VPC for my region:
$ aws ec2 create-default-vpc
{
    "Vpc": {
        "CidrBlock": "172.31.0.0/16",
        "DhcpOptionsId": "dopt-090334a93db5d1928",
        "State": "pending",
        "VpcId": "vpc-05f4807ec02f9dcfc",
        "OwnerId": "665553417851",
        "InstanceTenancy": "default",
        "Ipv6CidrBlockAssociationSet": [],
        "CidrBlockAssociationSet": [
            {
                "AssociationId": "vpc-cidr-assoc-0837a930349db9aa9",
                "CidrBlock": "172.31.0.0/16",
                "CidrBlockState": {
                    "State": "associated"
                }
            }
        ],
        "IsDefault": true,
        "Tags": []
    }
}
When creating a default VPC, the following is setup:
- Create a VPC with a size /16 IPv4 CIDR block (172.31.0.0/16). This provides up to 65,536 private IPv4 addresses.
- Create a size /20 default subnet in each Availability Zone. This provides up to 4,096 addresses per subnet, a few of which are reserved for our use.
- Create an internet gateway and connect it to your default VPC.
- Add a route to the main route table that points all traffic (0.0.0.0/0) to the internet gateway.
- Create a default security group and associate it with your default VPC.
- Create a default network access control list (ACL) and associate it with your default VPC.
- Associate the default DHCP options set for your AWS account with your default VPC.
On a side note, there are no additional charges for creating and using the VPC itself and there can be five Amazon VPCs per AWS account per region.
Next, I set up a security group with defined inbound rules to control incoming traffic. Security groups are stateful firewalls and work on instance level.
A stateless firewall doesn’t remember the state of connection and needs to set two rules for the same connection. Network ACLs are stateless firewalls and works on the subnet level.
$ aws ec2 create-security-group \
    --group-name EC2SecurityGroup \
    --description "my security group" \
    --vpc-id vpc-05f4807ec02f9dcfc
{
    "GroupId": "sg-0f01218e58d4c9f5e"
}


$ aws ec2 authorize-security-group-ingress \
     --group-id sg-0f01218e58d4c9f5e  \
     --ip-permissions \
     IpProtocol=tcp,FromPort=80,ToPort=80,IpRanges=[{CidrIp=0.0.0.0/0}] \
     IpProtocol=tcp,FromPort=22,ToPort=22,IpRanges=[{CidrIp=102.115.211.234/32}]
After that, I launched two Debian EC2 instances and used a user data script called webserver.sh to install Apache and display relevant instance information on a web page.
aws ec2 run-instances \
      --image-id ami-01e5ff16fd6e8c542\
      --instance-type t2.micro \
      --count 2 \
      --user-data file://webserver.sh \
      --security-groups EC2SecurityGroup \
      --key-name iamadmin
The content of webserver.sh looked like this:
#!/bin/bash
sudo apt-get update -y
sudo apt-get install apache2 unzip -y
echo '<html><center><body bgcolor="black" text="#39ff14" style="font-family: Arial"><h1>Load Balancer Demo</h1><h3>Availability Zone: ' > /var/www/html/index.html
curl http://169.254.169.254/latest/meta-data/placement/availability-zone >> /var/www/html/index.html
echo '</h3> <h3>Instance Id: ' >> /var/www/html/index.html
curl http://169.254.169.254/latest/meta-data/instance-id >> /var/www/html/index.html
echo '</h3> <h3>Public IP: ' >> /var/www/html/index.html
curl http://169.254.169.254/latest/meta-data/public-ipv4 >> /var/www/html/index.html
echo '</h3> <h3>Local IP: ' >> /var/www/html/index.html
curl http://169.254.169.254/latest/meta-data/local-ipv4 >> /var/www/html/index.html
echo '</h3></html> ' >> /var/www/html/index.html
With the EC2 instances set up, I proceeded to create an Application Load Balancer (ALB) and following that, I configured the load-balancer to forward incoming traffic to the EC2 instances.
$ aws elb create-load-balancer --load-balancer-name my-load-balancer --listeners "Protocol=HTTP,LoadBalancerPort=80,InstanceProtocol=HTTP,InstancePort=80" --subnets subnet-0fc6bc4ee17440803 --security-groups sg-0f01218e58d4c9f5e
{
    "DNSName": "my-load-balancer-1274689326.us-east-1.elb.amazonaws.com"
}
$ aws elb register-instances-with-load-balancer --load-balancer-name my-load-balancer --instances i-0f0366260bf4731f9 i-043485c174faa356e
{
    "Instances": [
        {
            "InstanceId": "i-043485c174faa356e"
        },
        {
            "InstanceId": "i-0f0366260bf4731f9"
        }
    ]
}
To ensure sticky sessions, I created an ALB cookie-based stickiness policy:
$ aws elb create-lb-cookie-stickiness-policy --load-balancer-name my-load-balancer --policy-name my-duration-cookie-policy --cookie-expiration-period 3600
Finally, if you wish to remove the sticky sessions, you can delete the load balancer policy:
$ aws elb delete-load-balancer-policy --load-balancer-name my-load-balancer --policy-name my-duration-cookie-policy
Second Approach.
Networking
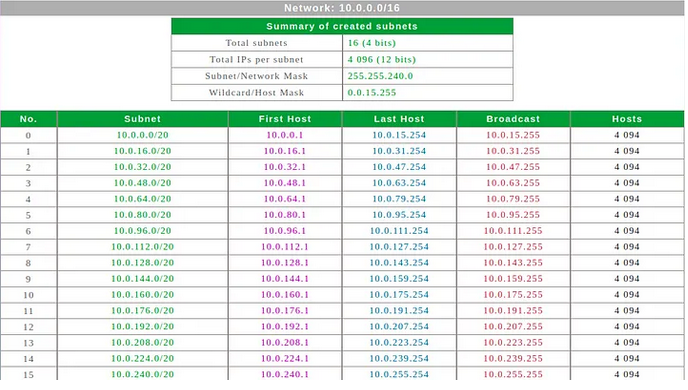
In this approach, I created a VPC and its components from scratch. I chose the network 10.0.0.0/16 with a subnet CIDR of /20.
This CIDR block can contain 16 subnets, and each subnet have 4096 hosts.
I create a non-default VPC.
$ aws ec2 create-vpc \
    --cidr-block 10.0.0.0/16 \
    --tag-specification "ResourceType=vpc,Tags=[{Key=Name,Value=MyVpc}]"
{
    "Vpc": {
        "CidrBlock": "10.0.0.0/16",
        "DhcpOptionsId": "dopt-090334a93db5d1928",
        "State": "pending",
        "VpcId": "vpc-09b3ec46021f15ca9",
        "OwnerId": "665553417851",
        "InstanceTenancy": "default",
        "Ipv6CidrBlockAssociationSet": [],
        "CidrBlockAssociationSet": [
            {
                "AssociationId": "vpc-cidr-assoc-08e94f66e21c3d7b6",
                "CidrBlock": "10.0.0.0/16",
                "CidrBlockState": {
                    "State": "associated"
                }
            }
        ],
        "IsDefault": false,
        "Tags": [
            {
                "Key": "Name",
                "Value": "MyVpc"
            }
        ]
    }
}
Next, I created two subnets: a private subnet (10.0.0.0/20) and a public subnet (10.0.16.0/20).
$ aws ec2 create-subnet \
              --vpc-id vpc-09b3ec46021f15ca9 \
              --cidr-block 10.0.0.0/20 \
              --tag-specifications "ResourceType=subnet,Tags=[{Key=Name,Value=my-public-subnet}]"
{
    "Subnet": {
        "AvailabilityZone": "us-east-1b",
        "AvailabilityZoneId": "use1-az1",
        "AvailableIpAddressCount": 4091,
        "CidrBlock": "10.0.0.0/20",
        "DefaultForAz": false,
        "MapPublicIpOnLaunch": false,
        "State": "available",
        "SubnetId": "subnet-0d311dd938d597785",
        "VpcId": "vpc-09b3ec46021f15ca9",
        "OwnerId": "665553417851",
        "AssignIpv6AddressOnCreation": false,
        "Ipv6CidrBlockAssociationSet": [],
        "Tags": [
            {
                "Key": "Name",
                "Value": "my-public-subnet"
            }
        ],
        "SubnetArn": "arn:aws:ec2:us-east-1:665553417851:subnet/subnet-0d311dd938d597785",
        "EnableDns64": false,
        "Ipv6Native": false,
        "PrivateDnsNameOptionsOnLaunch": {
            "HostnameType": "ip-name",
            "EnableResourceNameDnsARecord": false,
            "EnableResourceNameDnsAAAARecord": false
        }
    }
I’ve created the second subnet in a different availability zone as the ALB requires the subnets to be in different availability zones.
$ aws ec2 create-subnet \
    --vpc-id vpc-09b3ec46021f15ca9 \
    --cidr-block 10.0.16.0/20 \
    --tag-specifications "ResourceType=subnet,Tags=[{Key=Name,Value=my-private-subnet}]" \
    --availability-zone us-east-1c
{
    "Subnet": {
        "AvailabilityZone": "us-east-1c",
        "AvailabilityZoneId": "use1-az2",
        "AvailableIpAddressCount": 4091,
        "CidrBlock": "10.0.16.0/20",
        "DefaultForAz": false,
        "MapPublicIpOnLaunch": false,
        "State": "available",
        "SubnetId": "subnet-0f3fabe493bb1b5d9",
        "VpcId": "vpc-09b3ec46021f15ca9",
        "OwnerId": "665553417851",
        "AssignIpv6AddressOnCreation": false,
        "Ipv6CidrBlockAssociationSet": [],
        "Tags": [
            {
                "Key": "Name",
                "Value": "my-private-subnet"
            }
        ],
        "SubnetArn": "arn:aws:ec2:us-east-1:665553417851:subnet/subnet-0f3fabe493bb1b5d9",
        "EnableDns64": false,
        "Ipv6Native": false,
        "PrivateDnsNameOptionsOnLaunch": {
            "HostnameType": "ip-name",
            "EnableResourceNameDnsARecord": false,
            "EnableResourceNameDnsAAAARecord": false
        }
    }
}
Once the subnets were created, I created an Internet Gateway and attached it to the VPC to allow communication with the outside world.
$ aws ec2 create-internet-gateway \
              --tag-specifications "ResourceType=internet-gateway,Tags=[{Key=Name,Value=my-igw}]"
{
    "InternetGateway": {
        "Attachments": [],
        "InternetGatewayId": "igw-05e51b16e6c92372e",
        "OwnerId": "665553417851",
        "Tags": [
            {
                "Key": "Name",
                "Value": "my-igw"
            }
        ]
    }
}
$ aws ec2 attach-internet-gateway \
    --internet-gateway-id igw-05e51b16e6c92372e \
    --vpc-id vpc-09b3ec46021f15ca9
To enable communication between resources in the public subnet and the internet, I allocated an Elastic IP address.
$ aws ec2 allocate-address --domain vpc
{
    "PublicIp": "44.208.245.156",
    "AllocationId": "eipalloc-0943d51b19713fbfa",
    "PublicIpv4Pool": "amazon",
    "NetworkBorderGroup": "us-east-1",
    "Domain": "vpc"
}
Next, I launched a NAT Gateway in the public subnet to enable internet traffic from the public subnet.
$ aws ec2 create-nat-gateway --subnet-id subnet-0d311dd938d597785 --allocation-id eipalloc-0943d51b19713fbfa
{
    "ClientToken": "d9d6c649-9223-4982-bb6d-5b4cb35341a6",
    "NatGateway": {
        "CreateTime": "2023-07-03T12:58:06+00:00",
        "NatGatewayAddresses": [
            {
                "AllocationId": "eipalloc-0943d51b19713fbfa",
                "IsPrimary": true,
                "Status": "associating"
            }
        ],
        "NatGatewayId": "nat-0e6ab0ba45b9170ca",
        "State": "pending",
        "SubnetId": "subnet-0d311dd938d597785",
        "VpcId": "vpc-09b3ec46021f15ca9",
        "ConnectivityType": "public"
    }
}
After setting up the networking components, I configured route tables to control traffic within the VPC. I created a public route table and associated it with the public subnet.
$ aws ec2 create-route-table --vpc-id vpc-09b3ec46021f15ca9 --tag-specifications "ResourceType=rou
te-table,Tags=[{Key=Name,Value=rtbPublic}]"
{
    "RouteTable": {
        "Associations": [],
        "PropagatingVgws": [],
        "RouteTableId": "rtb-0e3f1665d25534814",
        "Routes": [
            {
                "DestinationCidrBlock": "10.0.0.0/16",
                "GatewayId": "local",
                "Origin": "CreateRouteTable",
                "State": "active"
            }
        ],
        "Tags": [
            {
                "Key": "Name",
                "Value": "rtbPublic"
            }
        ],
        "VpcId": "vpc-09b3ec46021f15ca9",
        "OwnerId": "665553417851"
    }
}
$ aws ec2 create-route-table --vpc-id vpc-09b3ec46021f15ca9 --tag-specifications "ResourceType=rou
te-table,Tags=[{Key=Name,Value=rtbPrivate}]"
{
    "RouteTable": {
        "Associations": [],
        "PropagatingVgws": [],
        "RouteTableId": "rtb-0e2e7b50b2353274b",
        "Routes": [
            {
                "DestinationCidrBlock": "10.0.0.0/16",
                "GatewayId": "local",
                "Origin": "CreateRouteTable",
                "State": "active"
            }
        ],
        "Tags": [
            {
                "Key": "Name",
                "Value": "rtbPrivate"
            }
        ],
        "VpcId": "vpc-09b3ec46021f15ca9",
        "OwnerId": "665553417851"
    }
}
After that, I added a route to the public route table to allow traffic to the internet through the internet gateway. Same is done for private route table.
$ aws ec2 create-route --route-table-id rtb-0e3f1665d25534814  --destination-cidr-block 0.0.0.0/0 --gateway-id igw-05e51b16e6c92372e
    "Return": true
}
$ aws ec2 create-route --route-table-id rtb-0e2e7b50b2353274b  --destination-cidr-block 0.0.0.0/0 --gateway-id igw-05e51b16e6c92372e
    "Return": true
}
Next, I associated the public subnet with the public route table. Same for public route table.
$ aws ec2 associate-route-table --route-table-id rtb-0e3f1665d25534814  --subnet-id subnet-0d311dd938d597785
    "AssociationId": "rtbassoc-04b5e096bfad18f6c",
    "AssociationState": {
        "State": "associated"
    }
}
$ aws ec2 associate-route-table --route-table-id rtb-0e2e7b50b2353274b  --subnet-id subnet-0f3fabe493bb1b5d9
    "AssociationId": "rtbassoc-00b7a8474e2f62585",
    "AssociationState": {
        "State": "associated"
    }
}
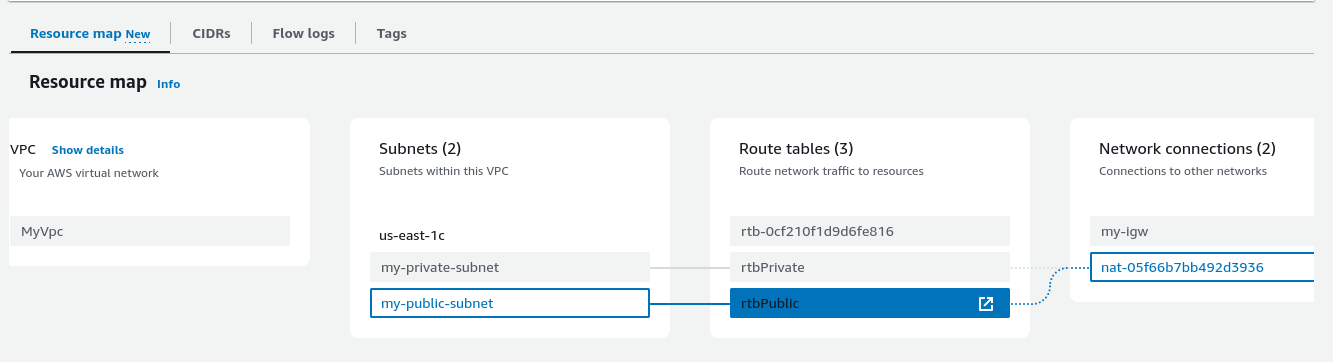
Here’s the resource map of my VPC. Note that the public route should point to the internet gateway instead of the nat (it’s my only screenshot of the resource map before I deleted all the resources).
I created a security group for the public subnet that allows inbound SSH (port 22) and HTTP (port 80) traffic.
$ aws ec2 create-security-group --group-name MYSecurityGroup --description "my security group" --vpc-id vpc-09b3ec46021f15ca9
    "GroupId": "sg-0d49026e9d7075801"
}
$ aws ec2 authorize-security-group-ingress \
                  --group-id sg-0d49026e9d7075801 \
                  --ip-permissions \
                  IpProtocol=tcp,FromPort=80,ToPort=80,IpRanges=[{CidrIp=0.0.0.0/0}] \
                  IpProtocol=tcp,FromPort=22,ToPort=22,IpRanges=[{CidrIp=102.115.219.225/32}]
Instances
I launched 2 Debian EC2 instances in the public subnet.
$ aws ec2 run-instances \
                --image-id ami-01e5ff16fd6e8c542 \
                --instance-type t2.micro \
                --count 2 \
                --user-data file://webserver.sh \
                --security-group-ids sg-0d49026e9d7075801 \
                --key-name iamadmin \
                --subnet-id subnet-0d311dd938d597785 \
                --associate-public-ip-address
I noted that only two AMIs, Amazon Linux 2 2.0.20190618 or later and Ubuntu 20.04 or later, come preinstalled with EC2 Instance Connect.
Application Load Balancer
There are 3 types of load balancer: Application Load Balancer, Network Load Balancer and Gateway Load Balancer. To get a better understand between those 3 load balancer, I asked ChatGPT to explain them to me like I’m 5. Here’s the response:
Application Load Balancer (ALB):
Imagine you have a big box of different candies, and you want to share them with your friends. The candies have different colors and flavors. You can use an ALB to give each of your friends the candies they like the most based on the color or flavor they ask for. Example: ALB is like a candy dispenser machine that gives your friends their favorite candies by looking at what they ask for, like chocolate or gummy bears. It’s great for sharing different types of candies with your friends.
Network Load Balancer (NLB):
Now, imagine you have a bunch of toys, and you want to give them to your friends. But instead of asking for specific toys, your friends just want a toy of a certain shape or size. You can use an NLB to give each friend a toy that matches what they are looking for based on its shape or size. Example: NLB is like a special sorting machine that gives your friends toys based on their favorite shape, like round or square. It’s great for making sure each friend gets the toy they like, no matter what kind it is.
Gateway Load Balancer (GWLB):
Imagine you have a magic tunnel that can take you to different places. But before going through the tunnel, you want to make sure it’s safe and secure. You can use a GWLB to check the tunnel and make sure it’s okay to go through by asking a special security guard to check it. Example: GWLB is like a security guard who checks the tunnel before you go through. They make sure everything is safe and protect you from any danger. It’s great for keeping you safe when you want to travel through the magic tunnel.
To summarize:
ALB is like a candy dispenser that gives friends their favorite candies based on what they ask for (good for sharing different types of candies).
NLB is like a sorting machine that gives friends toys based on their favorite shape or size (good for giving friends the toys they like, no matter what kind).
GWLB is like a security guard who checks the tunnel before you go through to make sure it’s safe (good for keeping you safe when traveling through a magic tunnel).
I create the load balancer and associated it with the two subnets. I forgot to add the security group to the load balancer which were necessary to whitelist my outgoing IP.
$ aws elbv2 create-load-balancer \
              --name my-load-balancer \
              --subnets subnet-0d311dd938d597785 subnet-0f3fabe493bb1b5d9
{
    "LoadBalancers": [
        {
            "LoadBalancerArn": "arn:aws:elasticloadbalancing:us-east-1:665553417851:loadbalancer/app/my-load-balancer/edd28830c3c4d971",lHostedZoneId": "Z35SXDOTRQ7X7K",
            "CreatedTime": "2023-07-03T13:13:17.540000+00:00",
            "LoadBalancerName": "my-load-balancer",
            "Scheme": "internet-facing",
            "VpcId": "vpc-09b3ec46021f15ca9",
            "State": {
                "Code": "provisioning"
            },
            "Type": "application",
            "AvailabilityZones": [
                {
                    "ZoneName": "us-east-1b",
                    "SubnetId": "subnet-0d311dd938d597785",
                    "LoadBalancerAddresses": []
                },
                {
                    "ZoneName": "us-east-1c",
                    "SubnetId": "subnet-0f3fabe493bb1b5d9",
                    "LoadBalancerAddresses": []
                }
            ],
            "SecurityGroups": [
                "sg-07b029ed08c06856e"
            ],
            "IpAddressType": "ipv4"
        }
    ]
}
I create target group with the specified name, protocol, port, and target type. The target type instance indicates that we will be using EC2 instances as targets.
$ aws elbv2 create-target-group \
              --name my-targets \
              --protocol HTTP \
              --port 80 \
              --target-type instance \
              --vpc-id vpc-09b3ec46021f15ca9
{
    "TargetGroups": [
        {
            "TargetGroupArn": "arn:aws:elasticloadbalancing:us-east-1:665553417851:targetgroup/my-targets/8165356fe658672a",
            "TargetGroupName": "my-targets",
            "Protocol": "HTTP",
            "Port": 80,
            "VpcId": "vpc-09b3ec46021f15ca9",
            "HealthCheckProtocol": "HTTP",
            "HealthCheckPort": "traffic-port",
            "HealthCheckEnabled": true,
            "HealthCheckIntervalSeconds": 30,
            "HealthCheckTimeoutSeconds": 5,
            "HealthyThresholdCount": 5,
            "UnhealthyThresholdCount": 2,
            "HealthCheckPath": "/",
            "Matcher": {
                "HttpCode": "200"
            },
            "TargetType": "instance",
            "ProtocolVersion": "HTTP1",
            "IpAddressType": "ipv4"
        }
    ]
}
The target servers (EC2 instances) need to be registed with the target group.
$ aws elbv2 register-targets \
    --target-group-arn arn:aws:elasticloadbalancing:us-east-1:665553417851:targetgroup/my-targets/8165356fe658672a --targets Id=i-0c8067f352172c5c7 Id=i-0f9af6d7f50381857
Next, I created a listener to listen for incoming traffic on the ALB.
$ aws elbv2 create-listener --load-balancer-arn arn:aws:elasticloadbalancing:us-east-1:665553417851:loadbalancer/app/my-load-balancer/edd28830c3c4d971 \
    --protocol HTTP \
    --port 80 \
    --default-actions Type=forward,TargetGroupArn=arn:aws:elasticloadbalancing:us-east-1:665553417851:targetgroup/my-targets/8165356fe658672a
{
    "Listeners": [
        {
            "ListenerArn": "arn:aws:elasticloadbalancing:us-east-1:665553417851:listener/app/my-load-balancer/edd28830c3c4d971/b8d451c4e99e5a94",
            "LoadBalancerArn": "arn:aws:elasticloadbalancing:us-east-1:665553417851:loadbalancer/app/my-load-balancer/edd28830c3c4d971",
            "Port": 80,
            "Protocol": "HTTP",
            "DefaultActions": [
                {
                    "Type": "forward",
                    "TargetGroupArn": "arn:aws:elasticloadbalancing:us-east-1:665553417851:targetgroup/my-targets/8165356fe658672a",
                    "ForwardConfig": {
                        "TargetGroups": [
                            {
                                "TargetGroupArn": "arn:aws:elasticloadbalancing:us-east-1:665553417851:targetgroup/my-targets/8165356fe658672a",
                                "Weight": 1
                            }
                        ],
                        "TargetGroupStickinessConfig": {
                            "Enabled": false
                        }
                    }
                }
            ]
        }
    ]
}
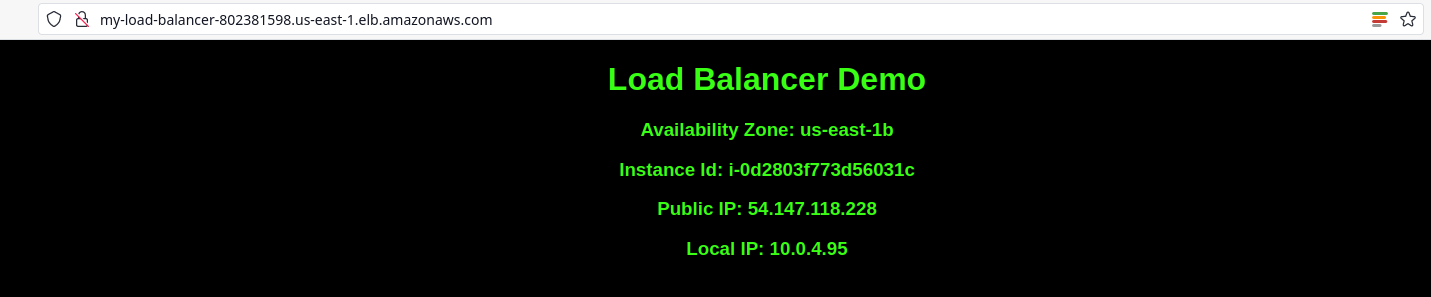
Here’s what I see when I browse the load balancer IPv4 DNS address:
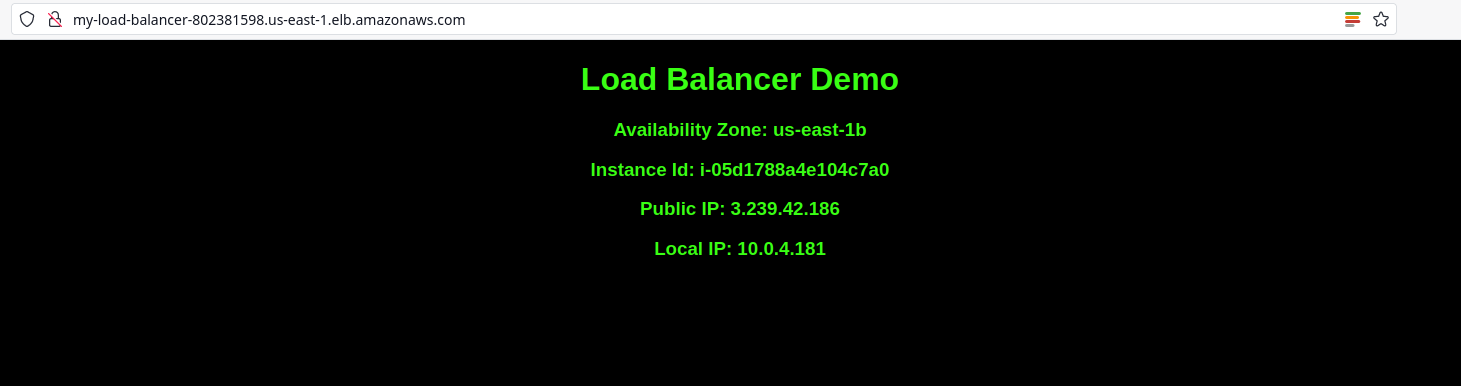
And here’s when I refresh the page:
I enabled stickiness to maintain session affinity for the users.
aws elbv2 modify-target-group-attributes --target-group-arn arn:aws:elasticloadbalancing:us-east-1:665553417851:targetgroup/my-targets/8165356fe658672a --attributes Key=stickiness.enabled,Value=true Key=stickiness.lb_cookie.duration_seconds,Value=60
{
    "Attributes": [
        {
            "Key": "target_group_health.unhealthy_state_routing.minimum_healthy_targets.count",
            "Value": "1"
        },
        {
            "Key": "stickiness.enabled",
            "Value": "true"
        }
}
And that’s all folks!
In conclusion, this experience of setting up an Application Load Balancer (ALB) between two web servers in AWS has been educational and insightful. I have learned valuable lessons and gained a deeper understanding of load balancing concepts. I am excited to continue learning and aspire to apply this knowledge in a production environment someday.
Resources
https://docs.aws.amazon.com/vpc/latest/userguide/what-is-amazon-vpc.html